But first we need to talk about how a camera works. When you put your camera in Auto mode, you are giving your camera complete control over how your picture turns out. And your camera doesn't always know best. It can't judge a scene like you can using your incredible human eyes and brain to assess lighting conditions. So your camera wants to make everything gray. Ever notice that your snowy-scene pictures make the snow look rather yucky instead of clean and bright white? That's your camera saying, "This scene is WAY too bright, I need to dull it down to an average gray."
Your camera on auto mode does the same thing if you're trying to take a picture of something really black. Your camera will sense that the scene is too dark and will try to make your blacks look like a washed-out gray, instead of more accurately representing the deep rich black that you see with your eyes.
 |
| Auto mode causes this image to be under-exposed, making the snow appear dingy and gray. |
 |
| With correct exposure |
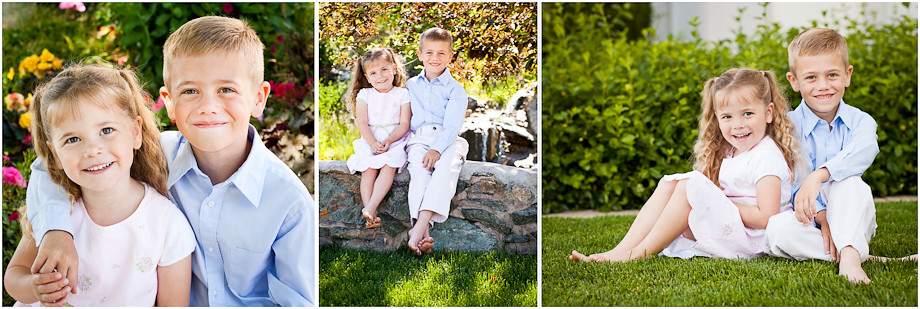
You can't always trust your camera. That's when you need to take your camera off auto mode, and spin that mode dial to a better setting. So, in order to do that, you need to understand about exposure. Exposure is essentially how light or dark the picture is. In the examples above, the image on the bottom is properly exposed, whereas the picture on the top is under-exposed. Proper exposure means that your camera is capturing the same brightness as you are seeing with your own eyes. The snow shouldn't be neon and glowing or losing detail because it is washed-out and too bright--that would mean it's over-exposed, but like the picture on the top, under-exposure is when pictures are darker than they should be--notice how gray the snow is and how dark the face is.
 |
| Under-exposed Properly exposed Over-exposed |
In these three examples, you can see how under- or over-exposing a picture can effect it's quality. Since your camera doesn't see light like your eyes do, setting your camera to auto mode may often cause under- or over-exposure of your images. So let's learn how to start taking control of your camera!
The Exposure Triangle
There are 3 elements of exposure that all work together to affect the exposure (brightness or darkness) of an image:
- Shutter Speed
- Aperture
- ISO
When you shoot in Auto mode, you are allowing your camera to choose the settings for each of these three elements that control exposure. So let's talk about what each of these elements is and what your camera is actually doing.
Photography is the art of light. Light is the medium used in photography just like paint is used to create a painting on an artist's canvas. Light enters your camera to record an image on your camera's sensor (or film). The shutter speed, aperture, and ISO all control how light enters your camera thus affecting how your image looks.
Shutter speed: The shutter speed controls how long the shutter over the camera's sensor is open, or how fast the shutter opens and closes over the sensor (or film). So a long shutter speed will let more light into your camera than a shorter shutter speed.
Aperture: The aperture is the size of the hole in the lens that is allowing light to reach the sensor. So the larger the hole, the more light will be let into the camera. (Note: Apertures are read in f-stops like f/4, f/11, etc. and the larger holes are actually represented by a smaller f-stop number. So f/4 is a much larger aperture than f/11 meaning an aperture of f/4 will allow much more light into your camera than an aperture of f/11.)

ISO: ISO refers to the sensitivity of the camera's sensor (or film) to light. So the higher the ISO, the more sensitive the camera is to light which will make the image brighter.
Window Analogy
So let's make an analogy that might help you make better sense of how the shutter speed, aperture, and ISO all work together to control the light into your camera, or the exposure.
Let's compare light going through your lens into your camera, with light going through a window into a room.

Shutter Speed: The shutter speed can be compared to how long the shutters are open over a window--the longer the shutters are open, the more light will get into the room.
Aperture: The aperture can be compared to the size of the window--the larger the window, the more light will get into the room.
ISO: The ISO can be compared with how darkly or lightly painted the walls in the room are painted--a white room will reflect more light and appear brighter, whereas a room with black painted walls will appear darker.
The Mode Dial
Now back to the mode dial... now that you know the three elements of the exposure triangle, you can start exploring with your camera out of auto mode. So what do all those other settings on the mode dial mean? Each camera's mode dial is a little different. Point-and-shoot cameras have fewer options. Entry-level DSLRs have a series of settings represented by letters and another series with pictures or scenes. More advanced DSLRs will only have the settings represented by letters.
The first set of camera modes dictate how much or how little control you allow your camera to have...
- Auto mode (represented by a green or teal box or camera shape): This setting tells the camera to choose ALL its own settings. The camera will assess the scene and decide for itself which shutter speed, aperture, and ISO will be used. The user has NO control.
- Program mode (P): In program mode, the camera will use the ISO setting that you have selected (or choose it's own if an automatic ISO is selected), and the camera will also choose its own aperture and shutter speed. So program mode is very similar to auto, but in Program mode, you have the ability to override any of the settings that it chooses and tweak them to your liking.
- Shutter Priority (S or Tv for Time Value): Shutter Priority mode allows you to choose the shutter speed and the camera will choose whatever aperture it thinks is appropriate to match. This would be valuable if you are photographing sports and know that you need a fast shutter speed to capture motion without any blur.
- Aperture Priority (A or Av for Aperture Value): Aperture Priority mode allows you to choose the aperture and the camera will choose whatever shutter speed it thinks is appropriate to match. Since aperture controls the depth of focus in an image (more info on that in a future post), then this mode could be useful if you know that you need a certain depth of focus.
- Manual Mode (M): Manual mode is where my camera hangs out. Manual mode turns all control over to YOU! You get to choose your own ISO, shutter speed, and aperture to get the exact look you want for your picture.
Scene Modes
Most point-and-shoots and entry-level DSLRs also have on the mode dial a series of little pictures which represent different scenes. These scene settings are preset functions your camera has (like a specialized auto mode) for common lighting situations you might encounter. The scene modes give your camera complete control to choose its own ISO, shutter speed, and aperture, but the scene settings allow you to give your camera a bit of a hint about what lighting situation you are in. Here are the most common scene settings to help you understand what each one is doing in your camera:
- Portrait: For pictures with a central subject--this setting uses a larger aperture to slightly blur the background for more focus on the subject.

- Landscape: Keeps all parts of the picture in focus with a smaller aperture and helps make colors more bold and vibrant.

- Sports: For fast-moving subjects to help prevent motion blur--this setting uses a fast shutter speed


- Beach or Snow: Use this setting for really bright or white scenes--it helps keep bright colors and whites from looking dull and gray by over-exposing more than auto mode would.


- Macro: Use this setting when you are taking a picture of something very close to your lens--it helps keep good focus on close-ups.

- Night: This setting is for photographing a dark scene that has NO central subject or person--it uses a long shutter speed and turns off the flash for more even lighting of dark scenes. You need to hold the camera VERY still or put it on a tripod to prevent any blur with long shutter speeds.

- Night Portrait: This setting is for photographing a person in a dark environment where the person needs to be lit. The camera will flash to make sure the person or subject is lit well.

- Low-Light: Similar to night, this setting is for pictures in a dimly-lit scene with NO central subject. The camera will not flash, but will use a slow shutter speed--so hold the camera very still to prevent motion blur.

- Low-Light Portrait: For photographing a person or subject in dim light--the camera will flash, but the flash will be weaker than Night Portrait mode.

- Fireworks: Similar to Night mode, but with an even longer shutter speed to allow more time to capture the trails of fireworks. The camera will not flash--the fireworks are light and don't need to be lit by anything else. And as always, with a long shutter speed, you need to stabilize your camera on a tripod to prevent blurring.

Whew! That's not much to keep straight, right?! So, my suggestion... make the exposure triangle your best friend so you can know for yourself what settings to use in any situation and shoot in Manual mode for nearly perfect pictures! So go get your cameras and start experimenting out of auto mode--you'll be pleasantly surprised to see just how good your images can start to look!
Stayed tuned for more tips and details on how the 3 elements of the exposure triangle work together.